Disappearing Nav Bar

Showing posts with label DIY. Show all posts

Thursday, August 30, 2012

NOTW: Nail Polish Strips Application

Hi beauties,

Before put and end to August 2012, I would share a tutorial of how to apply Nail Polish Strips. I'm sure some of us already knew about Nail Polish Strips, or also known as nail patches or dry nail applique. They are printed, self-adhesive and long- wearing polish stickers for nails. This new kind of polish has been introduced to the market by several popular brands, include Sally Hansen and OPI. You basically could find it at department stores, or beauty supply stores.  

These strips are made to self-adhere directly on the nail without applying glue to the strip or the nail. The strips are very thin and made of plastic-like material, which added protection from breaking or chipping nail. You could have unusual nail design on your finger nails and your toes only in seconds with zero drying time or smudging. 

Thumb, middle finger, and pinky nails: Pink leopard-print nail polish strips
Index and ring finger nails: O.P.I Princesses Rule
Before continue to the tutorial, let's prepare the tools you need:
1. Your choice of nail polish strips/ nail patches
2. Nail file
3. Base and top coat

Now, let's start the tutorial!!
1. I got my pink leopard-print nail polish strips, came in a pack of twelve

2. Remove previous nail posh, file and clean the nail. You might apply a layer of base coat to protect your nails.
(For the side notes, I prefer not buffing it; the strip won't adhere properly on a nail that is too smooth )
3. Select the appropriate size strip for your nail.
Remove the protective backing and apply the adhesive side directly on the nail. 
4. Smoothing the design over your nail with your finger, gently taking out any air bubbles and help the strip adhere better on the nail.
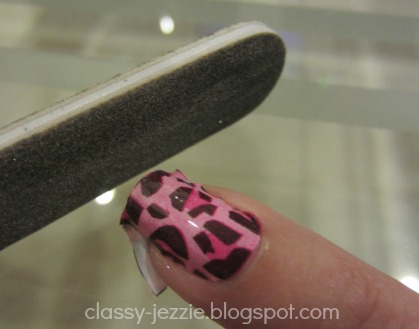
5. Use the nail file to get rid of the excess strip by gently filing the nail, thus cutting the strip.
File the edges to make it smooth. 
6. Finish it with a layer of clear top coat (optional)
Overall thoughts:

I feel really amazed for this nail polish strip invention. It is easy and quick to apply. I personally require quite some time to paint my nails with regular polishes, especially if there are smudges ;( 
But with these strips, I could have the perfect and glamorous nails within minutes (consider there are ten finger nails). If you are a busy bee, you should definitely try this nail polish strips. 

I actually didn't layer my strips with the top coat, since I found the liquid wet the sticker and slightly ruin the design. Although I didn't apply top coat, I managed to wear it about 4 days without chipping. The other good thing is either you have short or long nails, you could flexibly adjust it. 

Last but not least, I also feel so excited to tell you that now I officially will be part of Enchanté Yourlittlesecret team, since my friend personally asked me to help her. We also probably gonna have this nail polish strips available in our online store soon. Please don't hesitate to contact me if you are interested in it.

So, have you ever tried nail polish strips?? What do you think??

Amour, 

Tuesday, July 17, 2012

NOTW: DIY Ombré Nail Art

Hi girls,

Ombré trend is really hot right now. We could easily find this trend in clothing, hairstyles, and even nail design. This time, I would like to share how I do my DIY Ombré Nail Art. If you like to play around with the nail trend, I recommend you to try this trend too. It's just so easy and simple!!
Products I used:
1. Base coat
2. White nail polish, my usual Orly French Manicure Nail Lacquer
3. Soft light blue creme nail polish, which is China Glaze Electric Beat. It is my absolute favorite blue shade, and promise I'll do the review ASAP
4. Top coat
5. Makeup sponge (I'm using my unused powder sponge)
6. A piece of plastic
7. FIMO nail art (optional)

How to do??
1. Start off with applying base coat

2. Then apply two coats of white polish on each finger, and allow 3-5 minutes of drying time between each coat. I used white nail polish to make the gradient color shows up better.

3. Pour a small amount of your nail polish selection on a piece of plastic. Dip the tip of makeup sponge into the polish and stipple it onto your nails, covering the lower half of your nails (to the tips).

4. To make the darker gradient color, again, dip few more times the tip of your makeup sponge into the polish, and stipple the polish over the first layer of color, starting at the tip of your nail. Instead of using the same polish, you could use the darker shade nail polish to enhance the darker effect. You could repeat the same procedure until you like the way it looks. It should look like your nails are slowly getting darker as you go from the cuticle to the tip.

5. This step is completely optional—you can add decoration to your nail with a FIMO nail art, like I do with the blue butterfly on my both thumbs. 

6. Finally, apply a layer of top coat to preserve your nail design.

And voilà, you have trendy ombré nails that will be dazzling all summer long!! Please don't hesitate to share below if you try this trend too :)


Amour,

Sunday, June 24, 2012

NOTW: Watermelon Nail Art

Hello lovelies :) 

So I'm back with DIY Nail Art... It has been quite a while since my last tutorial post...

I was actually looking for an inspiration to do summer theme nail art. I want to create something fun and laid back design. Then, I thought about summer fruits and was instantly inspired by this fruit, watermelon! very summery, right??
Image from: uwnutritionprogram.wordpress.com

What products do you need???

Left to Right:
1. Pink polish, I used OPI My Address is Hollywood, more into a watermelon pink shade
2. Lime Green polish, used OPI Did It On 'Em
3. White polish, used Orly French Manicure Nail Lacquer 
4. Dark Green polish, I used OPI Jade is the New Black
5. Black polish, used China Glaze Ink with Ultra-Fine Nail Art Brush
6. Nail art brush, in case you don't have nail art pen 


And...here is the final results!!! 
How to do???
1. To protect your nails, don't forget to apply base coat on your nails first.
2. Paint your nails all in pink shade.
3. Paint a french tip using the lime green shade.
4. Add slightly dark green shade at the tip of your nail, at the top of the lime green tips.
5. Using white nail art pen or brush dipped in the white polish, draw the white line, under your lime green french tips, to add more finished look.
6. Draw black streaks under the french tips, to portray the watermelon seeds, and fill the middle part with thin streak of white polish to give more definition. You also could draw the seeds at random all over your nails as you want.
7. Once it's dry, add top coat 
8. And that's it... you get your watermelon nails ^^
Please let me know if you also recreate this nail art at home ^^ Leave me a comment if you have other request for next nail art tutorial... Thanks for stopping by :)

Amour,

Saturday, March 3, 2012

Simple Polkadot Nail Art

Dear all my lovelies,

Welcome to my initial post of my blog!! 


Just like other girls do, I also love to go for shopping, mix matching clothes, hunting for accessories, shoes, and bag, as well as experimenting with make up. I was actually inspired by so many beauty or fashion bloggers who are already existed in the blogging world. My conscience uttered that I also would love to express my passion in fashion and beauty industry to anyone in the world, either the one with same interest or not. I really hope that my blog posts could be friendly useful for my readers, since I love the feeling when I could assist my friends to look fabulous.

Recently I have an extreme obsession toward nail polish. I remember at my early age, I was not really into nail polish. My mom was used to drag me to paint my nail when I was supposed to intend a wedding party and such. However, I did not really like the feeling of having longer nail, which mean that I could break it anytime and the dirt easy to slip in. I just felt that’s not hygienic. (You could see how “hygienic kid” I was!!  Haha…XD)

As the time goes by, I guess when I was in college, I start to experiment with mascara, eyeliner, eye shadow,…, …, and NAIL POLISH. Then, I began to learn how to apply the polish properly by myself, and in sudden, I just drop all my “ hygienic theory” I had before, and just got this extreme obsession.

At recent, I was excited to do a simple nail art, and would love to share it with all of you.

I'm really all into color blocking these days. Therefore, I choose colorful yet simple theme for my nail at this time. I chose the combination of  a watermelon pink, white, and milky light pink/white color. I go for those colors, since I certain that even girls who are not really collecting bunch of nail polishes will probably have those basic colors.

So, what you need are:

1. OPI My Address is Hollywood.
It is suitable for the one who doesn't really dare to wear brighter neon pink. This is a nice shade of watermelon pink polish with minimal shimmer. The shimmer isn't harsh, and you can barely see it once it's been applied. Though OPI released this with their Autumn/Fall collection (Touring America 2011), this particular shade doesn't feel too "Autumn/Fall'' to me. It's a beautiful shade and is going to be perfect for Spring too.  I got mine as a set of Touring America Mini collection.
2. OPI So Many Clowns…So Little Time
This shade looks like nearly milky white than pink. Considered as nude color, this shade looks incredibly classy. My only*issue with this polish is, of course, the amount of coats it takes for it to be opaque- three. Mine is part of Femme de Cirque Mini set, but you also could find the regular 15 ml size. 
3. OPI Alpine Snow
It's definitely one of my favorite choices for white nail polish. It works really well and only needs 2 coats to be fully opaque. It is also perfect for French tip manicures. I used my mini Alpine Snow, which is part of Little Romantics Mini Lacquer set.
5. OPI Base Coat and RapiDry Top Coat
How to do:
1. Apply base coat using OPI Base Coat
2. Apply My Address is Hollywood and So Many Clowns...So Little Time alternately, since I don't want to make it look too much pink, and kinda avoid the same tone.
3. Wait for the applied nail polish to dry
4. On the top of My Address is Hollywood nail color, add white polkadot (OPI Alpine Snow) in small and large size alternately. In the other hand, on So Many Clowns...So Little Time nail color, add different size polkadot in the pink tone (using OPI My Address is Hollywood).
5. Using dotting tool, start to add the polkadot. It is better not to tip the dotting tool directly inside the nail polish bottle. Put some drops of the nail polish in a non-porous surface and use that as your palette, in my case I used paper. Depending on how much polish you add to the tip, the dots can be large or small.

6. Once the design dried, add the top coat (RapiDry Top Coat) to preserve your nail art.
7. Et Voilaaaa.....;)

So that’s the tutorial for this Simple Polkadot Nail Art. Hope you all enjoy it and please leave me a comment if you try this at home too…

Amour,
Related Posts Plugin for WordPress, Blogger...